


A 10-step Ultimate Guide To A DIY Manicure
Do you want to get hands-on about your manicure? If yes, this piece is for you.
But we have to warn you. DIY manicures, though affordable, are not cost-effective. For a lasting and effective manicure, it is best you hire experts like Skin Apeel.
Regardless, it wouldn’t hurt to know snackable manicure hacks. Perhaps you might have an urgent need for a quick fix.
That said, let’s get to the details.
Get The Vital Tools
The first step to your DIY manicure is the tools. So, get them. In case you don’t know what to get, here is a list for you:
- Base coat
- Callus/cuticle remover
- Clear topcoat
- Cotton swabs or pads
- Cuticle pusher and nippers
- Emery board
- Hand/nail moisturizer
- Nail buffer
- Nail clippers
- Nail polish
- Nail-polish remover
Once you get the vital manicure tools, the action begins!
Remove Previous Polish Off Your Nails
You can’t get an effective manicure on old finishings. In that case, use your nail polish remover to return your nails to their natural appearance.
However, note that there are two kinds of nail polish removers: the acetone and non-acetone type. So, which one of the two should you use?
If you want a fast-action nail polish remover, use the acetone types. They are quick-action aids and don’t stay long on your hands. In other words, you won’t worry about skin irritations.
With non-acetone nail polish removers, the action takes time. Regardless, they are gentle on the skin.
Pro tip: None of the acetone and non-acetone nail polish removers are friendly to the skin over extended contact periods. So, reduce the spread to just your nails and be as fast as possible.
Clip Your Nails
If your nails have outgrown the tip of your fingers, clip them. After, use a file to shape the trimmed nails into a slightly round or square edge.
Pro tip: You can be creative with nail shaping, but ensure the style is something you can reproduce for all your fingers.
About the file, we will advise Emery board, they have a gentle feel and won’t splinter your nails.
After shaping your nails, smoothen the sides and tips with a buffer. However, ensure that you only use a slightly abrasive aid. More importantly, aim for a moderate smoothness. Else, your polish won’t stick to your nails.
Soak Your Nails In Warm Water
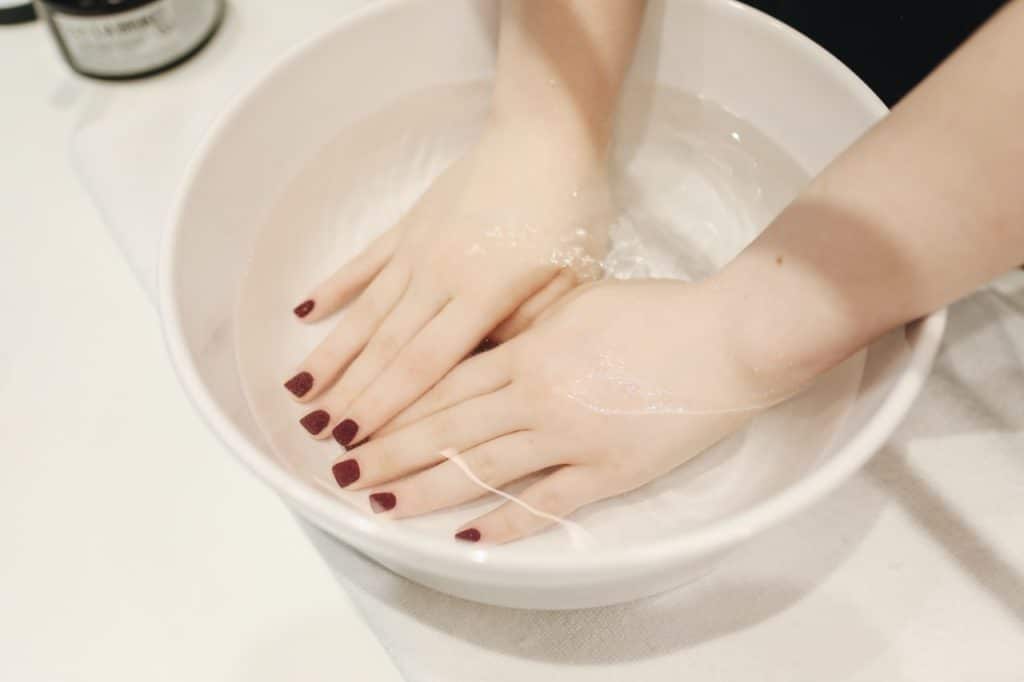
This step is the fun part; you relax and dip your clean and trimmed nails in a bowl of warm water.
The aim here is to deep-clean dirt from the nails. For effectiveness, you can add a few drops of shampoo to the warm water.
If you don’t have shampoo, a mild face cleanser will suffice. Whichever way, don’t over-soak your hands; a max of 3 mins is enough. Else, you might damage your nails and your skin.
Use Your Callus Remover
Oh, you should soak (in warm water) your cuticles to ease this stage. After, get the callus/cuticle remover and apply it to the thickened skins around your nails.
However, note that callus/cuticle remover has powerful components that might damage your skin. So, leave them on your cuticle for only a few seconds.
Remove Excess Callus And Cuticle
After applying the said remover from step 5, use a pusher to push your cuticle back from your skin. However, be careful not to push too hard or far; you might fray your skin, nail bed, or even damage nail growth if you are reckless.
And about recklessness, steer clear of forceful cuts on your cuticles. Also, don’t clip deep into your skin. Instead, use nippers to remove the free edges of your cuticle.
Remember to remove your hangnails. Just like your cuticle, be gentle with them too.
Moisturize Your Hand
This step is another window to relax your nails. So, get started with your hand moisturizer.
Use fragrance-free, silky oil or balm aids, massage them into your cuticles, nails, and your entire hands. Doing so will refresh your skin and hydrate its cells.
Prepare Your Nails For The New Polish
Remember you removed previously applied polish from your nails. And the steps that followed led here: freshly polished nails.
But before that, you must rid your nails of the moisturizing aids from step 8. Else, your polish won’t stick. So, how do you go about the process?
- First, clean the surface of your nails with a cotton pad or swab.
- Next, apply another round of nail polish remover on your nails to remove residual emollient or oil.
Now, add an artistic blend to your nails:
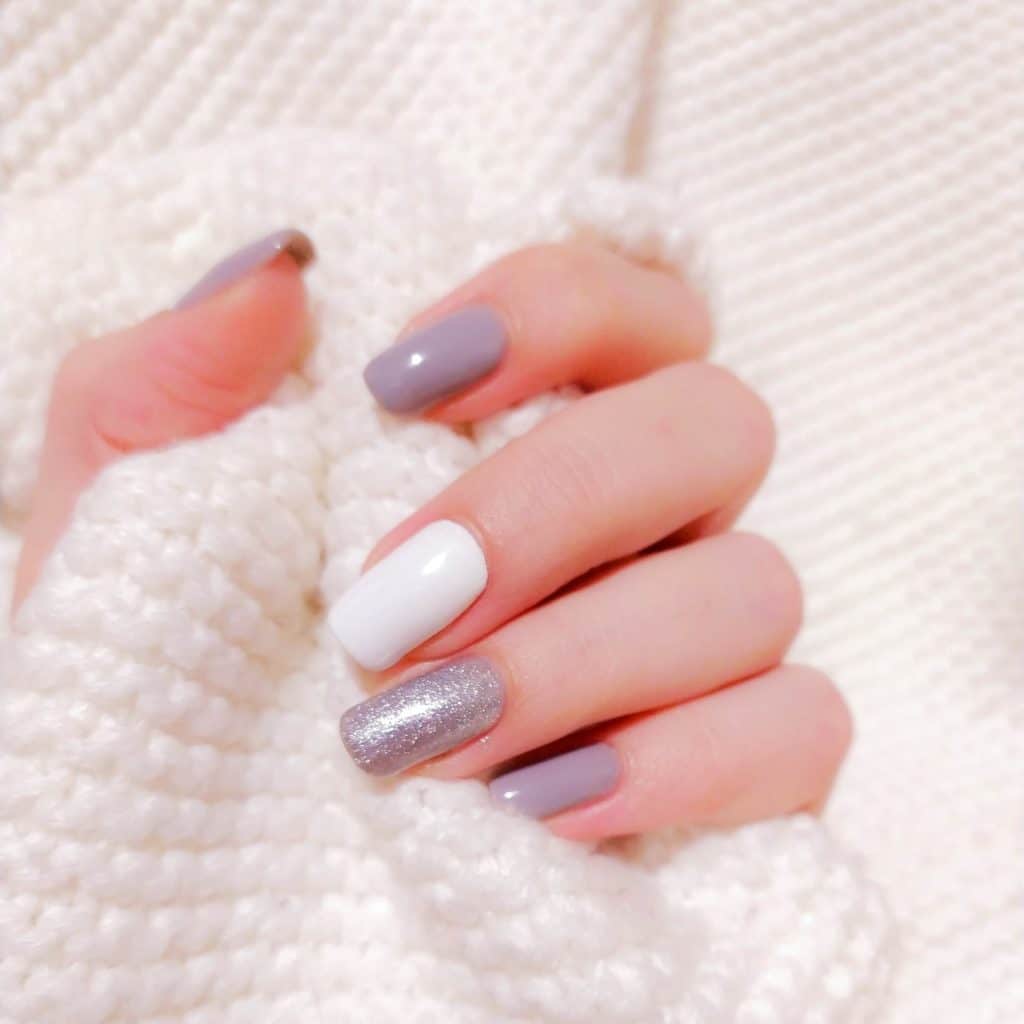
Beautify Your Diy Manicure Nails With Layered Painting
Layered painting happens in stages as follow:
- Apply a base coat on your nails, especially if your nails are brittle. With such a layer, you will prevent chipping and stains.
- Now, add your layers of color polish. We will advise that you stick to two colors for a start. And let each of the layers dry between your coats.
- Next, add a top coat on the two-color polished nails. That way, you will add gloss and brighten up your efforts so far.
Pro tip: Use light shade colors; they help to conceal mistakes. And about mistakes, clean them as soon as you notice since the polish will take time to dry.
A little maintenance tip: if you have the time, a single layer of top coat thrice in a week can keep your manicure fresh and beautiful. And never use heat to dry your nails or take them too close to a fan.
Moisturize Your Hands Again
Remember you cleared the first moisturizer to accommodate your nail polish. But your manicure (especially your cuticle) and skin still need hydration. In other words, you will re-moisturize.
And that’s it; you have done a DIY manicure and in 10 easy steps. Another thing to note is that you will need a bit of practice to master the tips we have listed here.
So, take your time. Manicure results come out the best when you do!
However, say you don’t have the time and prefer a professional manicure; then, seek an expert. This point is where we, Skin Apeel, can help.
Reach out today, and let’s help make your nails sparkle!